


How to Transform a Toy Horse into a Stunning Sculpture!
- Lori Siegel

- Jan 20
- 2 min read
On a recent trip to Goodwill, I spotted a large plastic horse in the toy section. It had graceful lines, a lifelike look, and it was not too cutesy. It reminded me of the large horse sculptures I have coveted in the past. When I saw it, my first thought was whether I could turn it into a piece that looked like a sculpture with some adjustments and paint. I went back and forth: yes, I could, maybe not, perhaps? In the end, I chose to add it to my cart for $6.32, figuring it was worth trying.
Let's see what happened:

This is the horse I discovered at Goodwill. It stands 20" tall and 18" wide. As I said earlier, it has beautiful lines and resembles an actual horse rather than a cartoon character.


After thoroughly cleaning the horse, I applied a mineral color chalk paint that significantly changed the horse's appearance, making the lines I mentioned more visible.


After the paint dried, I began working on the horse's mane and tail. First, I crafted a mane with spackle and water, smoothing it until I was satisfied. After trimming the tail, I shaped it into a circle using wire and fastened it securely. Before I could apply spackle to the tail, I needed to create a surface that would adhere. To achieve this, I paper-mâchéd the tail. Once it dried, I formed a tail using spackle (A list of all products used will be provided at the end of the post).


Next, I used a sponge to apply chalk paint in fawn and truffle colors to add depth and texture to the horse.


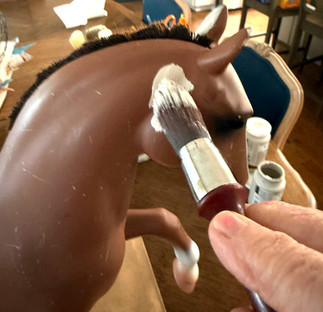
Once the paint had dried, I used a creamy white chalk paint, applying it with pouncing motion to add even more texture. I love how the subtle undertones of the fawn and truffle chalk paint shows through.


The final step was using dark wax to create shadow and contour.


The final result: What a transformation! It is hard to believe that this is the same horse. I intend to mount it on a wooden base, making it a beautiful piece to display on the table behind my sofa. I love it when a plan comes together like this!


Before and After
Products used:


Comments